Instant Gratification Abbreviated Vest
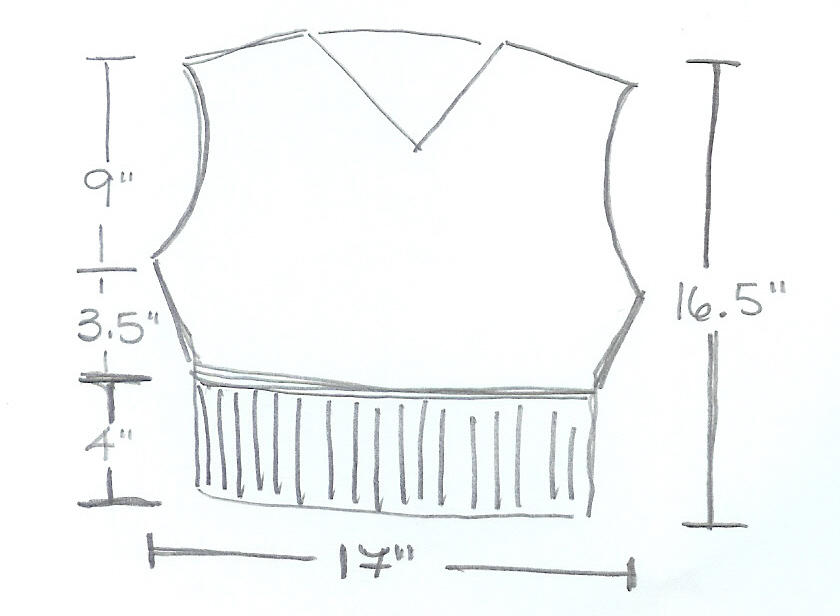
 This vest is very cropped, and is designed to be worn with shirt tails out, or with something flowy underneath. It is a close, but not tight fit, with attached i-cord edges. The bottom of the vest should hit at the top of your waist, and the top of the deep ribbing should hit where an empire waist would. Of course, you can and should adapt it to suit yourself! Notes on my sources of inspiration and helps in designing can be found on the blog.
Skills needed: knitting in the round, ribbing, attached i-cord
Materials:
About 600 yds of worsted-weight wool, 300 yds in each of two colors (I used Lion Brand Wool-Ease). This should give you plenty to make the vest plus a generous swatch.
Size 13 circular needles, or the appropriate size to get the right gauge
Size 10.5 dpn (to make attached i-cord edging, could use a different size)
Stitch holder(s)
Gauge: 2-2/3 sts per inch in st st on size 13 circ needles, in the round, with 2 strands held tog
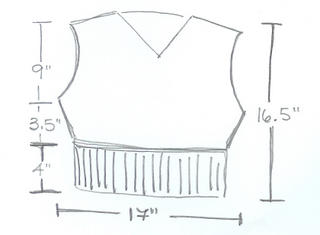 Size: Women’s Small/Medium (34” finished bust)
CO 90 sts on circ needles. Join, being careful not to twist your sts. Work in K3, P2 rib for 4 inches. Work in st st for 3.5 inches. Divide for front and back, placing half of your sts on a holder. Work the front and the back by knitting back and forth in st st on your circ needles.
Notes to make this your own! For different bust sizes, figure a negative 1 inch ease, and use that to figure your number of cast on sts. If you want to use the K3, P2 rib, you need to co a number of sts that is divisible by 5, rounding up or down as necessary for your preferred fit. Also, you should measure your torso from where you would want your armhole to begin to the top of the narrowest part of your waist. Then measure the armhole beginning to the bottom of your bra band. The difference between these two numbers is how much ribbing you should knit; the second measurement is how much you should knit in st st before you divide for front and back.
Back: At beg of next 4 rows, BO 2 sts. At ea end of the needle, dec 1 st in the next row. Work even until the armhole measures 9 in. At beg of next 4 rows, BO 4 sts. BO rem sts across back of neck.
If you are quite tall or long-waisted, you may also want to make your armholes a little deeper than 9 inches.
Front: Shape armholes as for back. Inc 1 st in next row. Work even until armholes measure 3 in. Divide for v-neck. K across 18 sts. (Place rem 18 sts on holder.) Turn and work back. Then dec 1 st ea neck edge 8 times. Next RS row, BO 4 sts. Next RS row, BO rem sts. Rep on other side, reversing shaping. Seam shoulders.
Attached i-cord edging: CO 4 sts on a dpn. Slide sts to other end of needle. Using another dpn, k 3 sts, slip the next st, pick up one st on neck edge. Pass slipped st over picked up st. Slide all sts to other end of dpn. Rep until you have worked all the way around the neck. Sew or graft ends of i-cord edging tog. Rep for armholes.
© Laura Phillips, 2005
For non-commercial use only
For non-commercial use only
posted by Laura at 6:20 PM
![]()
![]()


0 Comments:
Post a Comment
<< Home