Thursday, June 30, 2005

Throwers! Take Your Buttons!


Thursday, June 02, 2005

Instant Gratification Abbreviated Vest

This vest is very cropped, and is designed to be worn with shirt tails out, or with something flowy underneath. It is a close, but not tight fit, with attached i-cord edges. The bottom of the vest should hit at the top of your waist, and the top of the deep ribbing should hit where an empire waist would. Of course, you can and should adapt it to suit yourself! Notes on my sources of inspiration and helps in designing can be found on the blog.

Skills needed: knitting in the round, ribbing, attached i-cord

Materials:
About 600 yds of worsted-weight wool, 300 yds in each of two colors (I used Lion Brand Wool-Ease). This should give you plenty to make the vest plus a generous swatch.
Size 13 circular needles, or the appropriate size to get the right gauge
Size 10.5 dpn (to make attached i-cord edging, could use a different size)
Stitch holder(s)

Gauge: 2-2/3 sts per inch in st st on size 13 circ needles, in the round, with 2 strands held tog

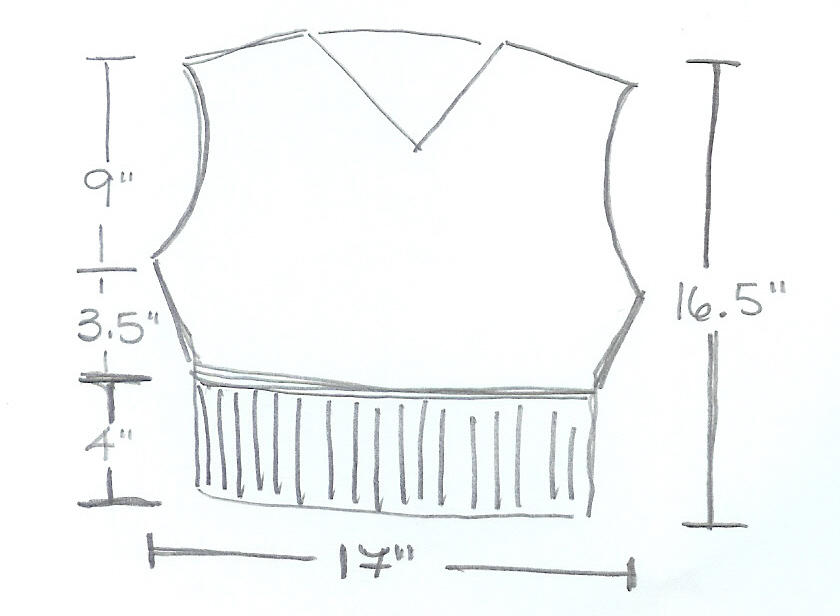
Size: Women’s Small/Medium (34” finished bust)

CO 90 sts on circ needles. Join, being careful not to twist your sts. Work in K3, P2 rib for 4 inches. Work in st st for 3.5 inches. Divide for front and back, placing half of your sts on a holder. Work the front and the back by knitting back and forth in st st on your circ needles.

Notes to make this your own! For different bust sizes, figure a negative 1 inch ease, and use that to figure your number of cast on sts. If you want to use the K3, P2 rib, you need to co a number of sts that is divisible by 5, rounding up or down as necessary for your preferred fit. Also, you should measure your torso from where you would want your armhole to begin to the top of the narrowest part of your waist. Then measure the armhole beginning to the bottom of your bra band. The difference between these two numbers is how much ribbing you should knit; the second measurement is how much you should knit in st st before you divide for front and back.
Back: At beg of next 4 rows, BO 2 sts. At ea end of the needle, dec 1 st in the next row. Work even until the armhole measures 9 in. At beg of next 4 rows, BO 4 sts. BO rem sts across back of neck.
If you are quite tall or long-waisted, you may also want to make your armholes a little deeper than 9 inches.
Front: Shape armholes as for back. Inc 1 st in next row. Work even until armholes measure 3 in. Divide for v-neck. K across 18 sts. (Place rem 18 sts on holder.) Turn and work back. Then dec 1 st ea neck edge 8 times. Next RS row, BO 4 sts. Next RS row, BO rem sts. Rep on other side, reversing shaping. Seam shoulders.
Attached i-cord edging: CO 4 sts on a dpn. Slide sts to other end of needle. Using another dpn, k 3 sts, slip the next st, pick up one st on neck edge. Pass slipped st over picked up st. Slide all sts to other end of dpn. Rep until you have worked all the way around the neck. Sew or graft ends of i-cord edging tog. Rep for armholes.
© Laura Phillips, 2005
For non-commercial use only

Upside Down Stocking Hat

Here's a very easy stocking cap made "upside down" by knittng a few inches of I-cord, and then increasing at regular intervals. There are a number of advantages to knitting a hat this way. You don't need to know your gauge before you start. It's good for people who hate casting on. And you can change your mind about the intended recipient (up to a point). I am certain that I am not the first person to make a hat this way, but I have crunched some numbers to make it very easy for you! First, the essential information:

Yarn: 200-400 yds of worsted weight wool-acrylic blend (this is Plymouth Encore and Wool-Ease), depending on size.
Needles: you will need dpn's and a circular needle in the size that you prefer to use for worsted weight wool (I used 7s).
Gauge: will vary, but probably will range between 4 and 5 sts per inch

The Upside Down Version

CO 4 sts. Using dpns, make 4 inches of I-cord or to desired length. (Option: for teenage boys and other self-conscious people, you can skip the I-cord, and simply k these 4 sts for 1 or 2 rounds, then begin the increases on the next round.)

Next round: Inc in every st (8 sts). K 4 rnds even. Inc in every st (16 sts). Change color [CC], if making stripes. K 4 rnds even.

Now you continue increasing as follows, until the circumference of your hat will fit the head of your intended recipient. I have listed the increase rounds and how many sts you should have after each below. Also, I have indicated here how many sts you will need to achieve three sizes, over three gauges. The number of sts below correspond to the following sizes: Small (about 20") [Medium (about 21-22")/Large (about 23-24")].

4 sts/inch: Inc to 80 [88, 96] sts. Total number of inc rnds: 10 [11, 12].
4.5 sts/inch: Inc to 88 [96, 104] sts. Total number of inc rnds: 11 [12, 13].
5 sts/inch: Inc to 96 [104, 112] sts. Total number of inc rnds: 12 [13, 14].

Inc rnd: K1, inc in next st, rep around (24 sts). CC. K 4 rnds.
Inc rnd: K2, inc in next st, rep around (32 sts). CC. K 4 rnds.
Inc rnd: K3, inc in next st, rep around (40 sts). CC. K 4 rnds.
Inc rnd: K4, inc in next st, rep around (48 sts). CC. K 4 rnds.
Inc rnd: K5, inc in next st, rep around (56 sts). CC. K 4 rnds.
Inc rnd: K6, inc in next st, rep around (64 sts). CC. K 4 rnds.
Inc rnd: K7, inc in next st, rep around (72 sts). CC. K 4 rnds.
Inc rnd: K8, inc in next st, rep around (80 sts). CC. K 4 rnds.
Inc rnd: K9, inc in next st, rep around (88 sts). CC. K 4 rnds.
Inc rnd: K10, inc in next st, rep around (96 sts). CC. K 4 rnds.
Inc rnd: K11, inc in next st, rep around (104 sts). CC. K 4 rnds.
Inc rnd: K12, inc in next st, rep around (112 sts). CC. K 4 rnds.

For smaller gauges, or bigger heads, do more inc rnds, adding one more k st between incs each time. For a more "stretched-out" look, work more even rnds btwn incs.

K even for 4 [5, 6] inches. K3, p1 rib for 1.5 inches. Bind off in ribbing.

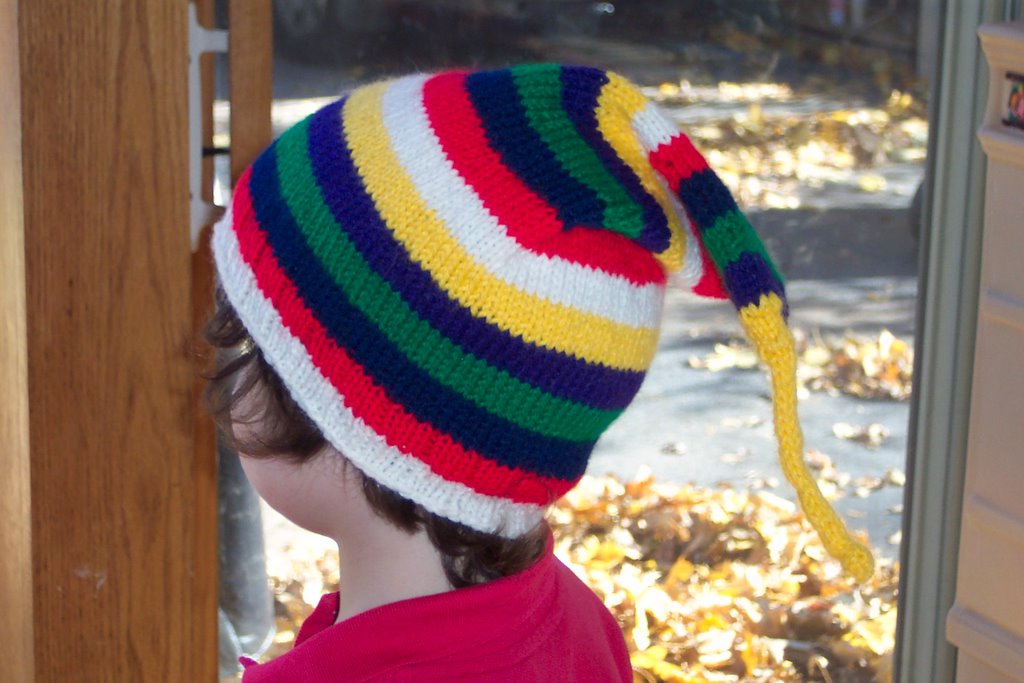
The Right Side Up Version

You can also knit this hat in the traditional manner from the brim to the crown, but you will have to know your gauge first. Simply cast on the number of sts for the final increase round for your desired size, and then work the pattern "backwards" -- decreasing instead of increasing, until you eventually are making I-cord. (The decreases may be more obvious than the increases.) If you hate binding off, this method is for you. Or, some people feel that beginning with a small number of sts and increasing out makes the project seem to go slower than casting on many sts and decreasing down.

Tips:
  • If you are working stripes, trap the ends as you change colors and you won't have a million ends to weave in.
  • If you do ribbing over more than one color, knit all sts in the first round of the new color. This prevent those "blips" of the old color on the purl sts.
  • It is much easier to knit in the round over a very small number of sts using one long circular needle than dpns.

Have fun!

You may copy this pattern, but don't use it for commercial purposes!

iPod Cozy

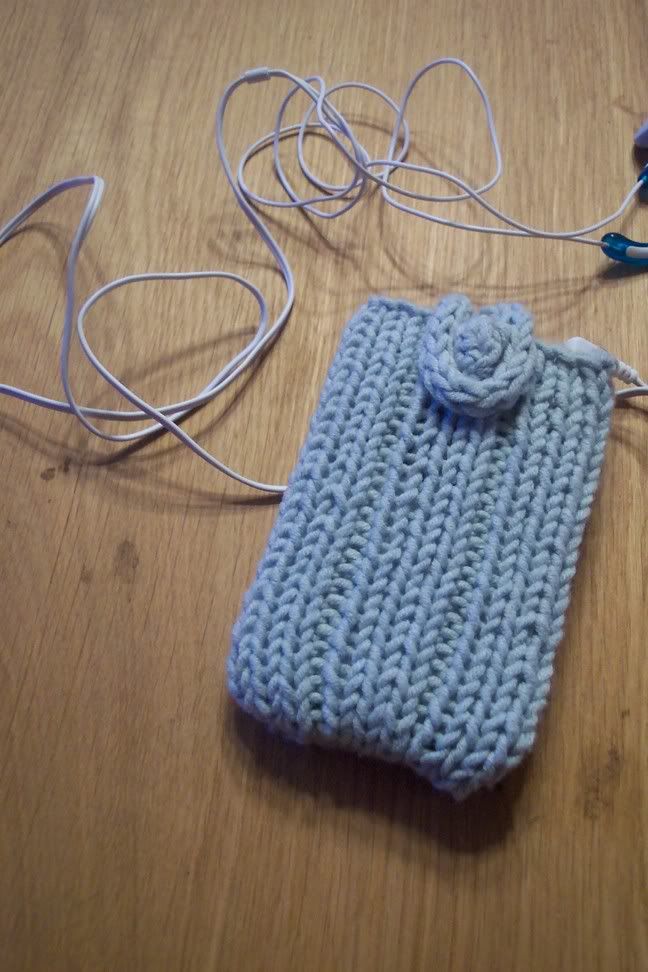
You wouldn't want your baby to get cold. Or scratched. So delve into your stash and make a cover for your iPod (or other MP3 player).

Yarn and Needles: You want to use something that will give you a gauge of about 17-18 sts per 4 in, and an appropriate sized needles for that yarn. I used Rowan All Seasons Cotton and size 7 needles. My sister made one with Debbie Bliss Alpaca Silk and size 7 needles. You will need a very little bit of yarn -- I'd say less than a quarter of a ball. This is a perfect project for that little bit of nice yarn that's been sitting around.

Size: This pattern will fit the regular iPod, both the older chunky ones, and the new slim ones. (Yay for the stretchiness of ribbing.) The finished dimensions are 2.25 in wide by 4.75 in high, unstretched.

3x1 Rib Pattern stitch:

Row 1 (WS): *P 3, K 1, rep from * across.

Row 2 (RS): *K 3, P 1, rep from * across.

CO 24 sts. Work in 3x1 rib until you have knit the height of your player, about 4.75 inches. BO in patt. Fold work in half and seam along bottom and long side. You can leave a hole in the seam at the bottom for the dock connector, if you like.

Closures: You can be creative. You could sew a button on the front and thread some extra yarn through the back to wrap around it, like a manila folder. You could knit a little more and do a traditional button and buttonhole. I made about 4 in of i-cord and attached it to the back as a loop. Then I made an "afterthought bobble," which I unvented but undoubtedly many other people have already thought up.

Afterthought Bobble: With the same size (or close) dpn as you used to knit the cozy, pick up one st about 1 in below the top of the cozy. K this st. Slide it to the other end of the dpn, and k into the front, back, and front of this st -- 3 sts. Slide the sts to the other end and k these sts. Slide them back to the other end and K3tog -- 1 st. Slide st to other end of dpn and K this st. Cut yarn and draw through this st. With yarn needle, pull tail through to wrong side and secure bobble.

A final thought: You can use swatches for larger projects to cover your iPod. Aim to make your swatch about as tall and about twice as wide as your iPod, and after you are finished with your measuring, etc. you can seam it up and slip in your MP3 player. Sweet.

Ribbed Anklewarmers


Minty made legwarmers, and modeled them peeking out from under her jeans. Too cute. I designed these to be trim and short, thus fitting nicely under a pair of jeans or other pants. Of course, you could always make them longer.

Yarn: Slightly more than 100 yds of worsted weight wool or wool-acrylic blend. I used Lion Brand Wool-Ease.
Needles: Size 7 dpns or 40-inch circular.
Gauge: About 5.5 sts per inch, in unstretched ribbing.
Size: About 6.5 inches long and 8 inches around, with rib relaxed. One size fits most ankles. If you want to change, CO more or fewer sts in multiples of 4.

3x1 ribbing pattern stitch: *K3, p1, rep from * around.

CO 44 sts. Join and knit first 2 rnds plain. Begin patt st. Work until piece meas about 6 inches. K next 2 rnds plain. BO very loosely. Make another.